> ## Documentation Index
> Fetch the complete documentation index at: https://reaperagent.com/docs/llms.txt
> Use this file to discover all available pages before exploring further.
# Dialogue Tools
> Use Reagent to automatically edit and process raw voice recordings
## Automatic Dialogue Editor
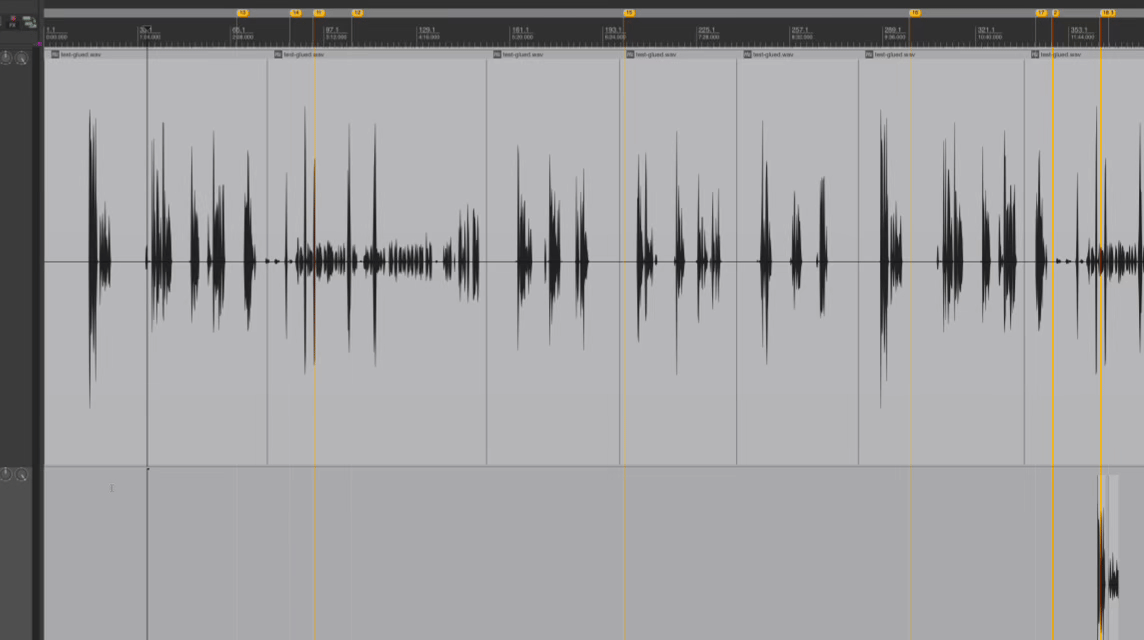 Strip silence can't tell a pause from a new take. Dialogue editing in Reagent **transcribes your audio and uses LLM to identify each take**, then splits them into separate items — trimmed, renamed to match the spoken text, and color-coded by quality.
This means it can:
* **Distinguish takes from pauses** — a breath or hesitation within a take won't cause a false split
* **Detect retakes** — recognizes when the speaker starts the same line over, even without a long silence
* **Handle meta-commentary** — filters out things like "let me try that again" between takes
* **Classify take quality** — marks each take as **good** (complete reading) or **incomplete** (cut off or interrupted), color-coding incomplete takes for quick visual identification
```
Edit VO
```
```
Edit the dialogue on the VO track and remove the incomplete takes
```
### Analysis Modes
When you ask Reagent to analyze dialogue, it will ask you to choose between two modes:
* **Voice-takes** — For studio recordings where a speaker reads lines with multiple takes per line. Reagent identifies individual takes, detects retakes, and classifies quality. If you don't have a reference script, Reagent automatically reconstructs one from the transcript for more accurate take classification.
* **Podcast** — For long-form recordings with multiple speakers. Reagent aligns your audio against a reference script and identifies sections to keep or cut.
You can also specify the mode directly in your message:
```
Edit VO using voice-takes mode
```
```
Edit podcast recording using the attached script
```
### Podcast Mode
Podcast mode is designed for editing long-form recordings like podcasts, audio books, interviews, or narration sessions.
When using podcast mode with a reference script, Reagent:
* **Aligns audio to your script** — matches spoken sections to their corresponding lines in the script
* **Shows suggested edits** — gaps and off-script sections appear as red (incomplete) items in REAPER, so you can preview what will be cut before committing
```
Edit this podcast using the attached script as reference
```
Review the red items in REAPER to see what Reagent suggests cutting, then ask it to remove the incomplete takes when you're ready.
### Pipeline Stages
Under the hood, dialogue editing runs through three stages. You can let Reagent handle all three automatically, or run them individually for more control:
1. **Transcribe** — Listens to your voice recordings and generates word-level transcriptions with timestamps. Results are stored on each item for use in the next stages.
2. **Analyze** — Reads the transcriptions and detects take boundaries, computes trim points, and classifies each take as good or incomplete. You can also provide custom analysis instructions instead of standard take detection — for example, finding all speaker names, marking questions vs. statements, or identifying topic changes.
3. **Apply Edits** — Splits items at the detected take boundaries, trims silence, and renames each take to match the spoken text. For large batches, an analyst step plans the full set of splits, markers, and deletions before any of them touch your project, so big edits stay accurate even across hundreds of takes.
Running stages individually is useful when you want to inspect transcriptions before applying edits, adjust settings between steps, or use the analysis stage with custom instructions for non-standard workflows.
```
Transcribe the dialogue on the VO track
```
```
Now analyze it and apply the edits with 50ms padding
```
### Script Reference Files
If you have a script, cue sheet, or line list for your recording, you can provide it as a reference file to improve take classification accuracy. Reagent compares the transcribed audio against your script to better identify which takes are complete readings and which are partial or off-script.
Supported formats: **CSV**, **TSV**, **TXT**, **XLSX**, **PDF**, **DOCX**
You can attach reference files directly in the chat input using the **+** button or by pasting the file path:
```
Edit the voice takes on this item using the attached script as reference
```
When a script reference is provided, takes that don't match any line in the script are automatically removed.
### Multi-Item Podcast Analysis
When you have a long recording split across multiple items, Reagent can analyze them together as a single unified timeline. Select all the items and run podcast mode — Reagent merges them internally for more accurate alignment and edit suggestions.
```
Edit these 3 podcast items together using the attached script
```
### Rename from Text
By default, edited media items will be renamed to match what was actually said. This makes it easy to identify takes at a glance in REAPER.
***
## Translation
Strip silence can't tell a pause from a new take. Dialogue editing in Reagent **transcribes your audio and uses LLM to identify each take**, then splits them into separate items — trimmed, renamed to match the spoken text, and color-coded by quality.
This means it can:
* **Distinguish takes from pauses** — a breath or hesitation within a take won't cause a false split
* **Detect retakes** — recognizes when the speaker starts the same line over, even without a long silence
* **Handle meta-commentary** — filters out things like "let me try that again" between takes
* **Classify take quality** — marks each take as **good** (complete reading) or **incomplete** (cut off or interrupted), color-coding incomplete takes for quick visual identification
```
Edit VO
```
```
Edit the dialogue on the VO track and remove the incomplete takes
```
### Analysis Modes
When you ask Reagent to analyze dialogue, it will ask you to choose between two modes:
* **Voice-takes** — For studio recordings where a speaker reads lines with multiple takes per line. Reagent identifies individual takes, detects retakes, and classifies quality. If you don't have a reference script, Reagent automatically reconstructs one from the transcript for more accurate take classification.
* **Podcast** — For long-form recordings with multiple speakers. Reagent aligns your audio against a reference script and identifies sections to keep or cut.
You can also specify the mode directly in your message:
```
Edit VO using voice-takes mode
```
```
Edit podcast recording using the attached script
```
### Podcast Mode
Podcast mode is designed for editing long-form recordings like podcasts, audio books, interviews, or narration sessions.
When using podcast mode with a reference script, Reagent:
* **Aligns audio to your script** — matches spoken sections to their corresponding lines in the script
* **Shows suggested edits** — gaps and off-script sections appear as red (incomplete) items in REAPER, so you can preview what will be cut before committing
```
Edit this podcast using the attached script as reference
```
Review the red items in REAPER to see what Reagent suggests cutting, then ask it to remove the incomplete takes when you're ready.
### Pipeline Stages
Under the hood, dialogue editing runs through three stages. You can let Reagent handle all three automatically, or run them individually for more control:
1. **Transcribe** — Listens to your voice recordings and generates word-level transcriptions with timestamps. Results are stored on each item for use in the next stages.
2. **Analyze** — Reads the transcriptions and detects take boundaries, computes trim points, and classifies each take as good or incomplete. You can also provide custom analysis instructions instead of standard take detection — for example, finding all speaker names, marking questions vs. statements, or identifying topic changes.
3. **Apply Edits** — Splits items at the detected take boundaries, trims silence, and renames each take to match the spoken text. For large batches, an analyst step plans the full set of splits, markers, and deletions before any of them touch your project, so big edits stay accurate even across hundreds of takes.
Running stages individually is useful when you want to inspect transcriptions before applying edits, adjust settings between steps, or use the analysis stage with custom instructions for non-standard workflows.
```
Transcribe the dialogue on the VO track
```
```
Now analyze it and apply the edits with 50ms padding
```
### Script Reference Files
If you have a script, cue sheet, or line list for your recording, you can provide it as a reference file to improve take classification accuracy. Reagent compares the transcribed audio against your script to better identify which takes are complete readings and which are partial or off-script.
Supported formats: **CSV**, **TSV**, **TXT**, **XLSX**, **PDF**, **DOCX**
You can attach reference files directly in the chat input using the **+** button or by pasting the file path:
```
Edit the voice takes on this item using the attached script as reference
```
When a script reference is provided, takes that don't match any line in the script are automatically removed.
### Multi-Item Podcast Analysis
When you have a long recording split across multiple items, Reagent can analyze them together as a single unified timeline. Select all the items and run podcast mode — Reagent merges them internally for more accurate alignment and edit suggestions.
```
Edit these 3 podcast items together using the attached script
```
### Rename from Text
By default, edited media items will be renamed to match what was actually said. This makes it easy to identify takes at a glance in REAPER.
***
## Translation
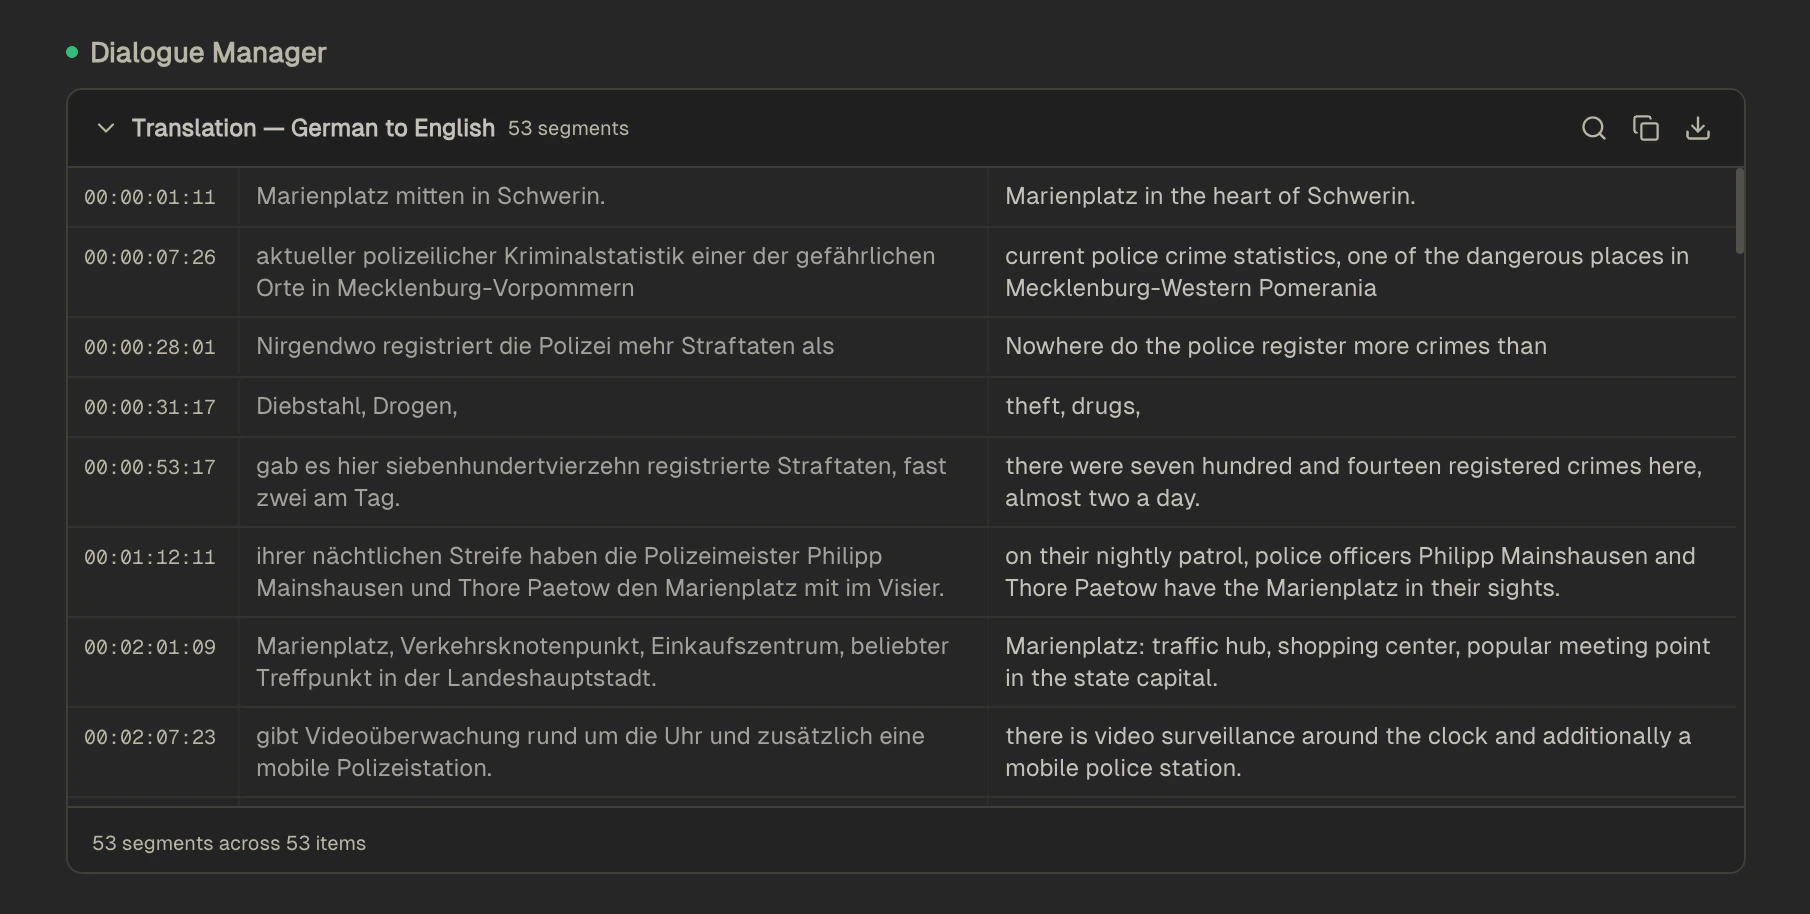 When Reagent transcribes non-English audio, it automatically detects the language and provides an English translation alongside the original transcription. The default is to translate to English, but you can specify a different language in your prompt. You can also use this just to view dialogue lines as well without translation.
Translations appear in a dedicated **Dialog Manager View** below the chat, where you can:
* **Search for specific lines** to quickly find a particular section.
* **Play from any line** click on timestamp to hear the original audio alongside the translation.
* **Export to PDF** Download as PDF.
* **Copy line text** to paste into other applications.
You can bring up this view after transcription using any of the following prompts:
```
Translate the dialogue to English.
OR
Show me dialogue lines.
OR
Show me dialogue lines in Japanese.
```
***
## Volume Leveling
Automatically level dialogue or vocal recordings by generating a take volume envelope that normalizes dynamic range. Works on any voice, dialogue, or vocal items.
```
Level the volume on the selected items
```
```
Apply volume leveling to selected items targeting -23 LUFS
```
You can control the following parameters through natural language:
| Parameter | Default | What it controls |
| -------------------- | ------------- | -------------------------------------------------------------------------------------------------------- |
| **Target level** | -18 dB | If you want to use LUFS specifically say "lufs" in your prompt otherwise this defaults to peak loudness. |
| **Gain range** | -12 to +12 dB | Min/max gain adjustment — limits how much the leveler can cut or boost |
| **Attack** | 20 ms | How quickly gain increases — lower values react faster to quiet sections |
| **Release** | 80 ms | How quickly gain decreases — lower values react faster to loud sections |
| **Lookahead** | 50 ms | Shifts the envelope earlier to anticipate level changes |
| **Window size** | 50 ms | Analysis window — larger windows produce smoother, less reactive leveling |
| **Smoothing passes** | 2 | Number of smoothing passes on the envelope to reduce artifacts |
```
Level the selected items with faster attack (10ms) for more aggressive leveling
```
```
Apply gentle volume leveling with only 6dB of gain range
```
```
Level these items targeting -14dB with a 100ms window for smoother results
```
When Reagent transcribes non-English audio, it automatically detects the language and provides an English translation alongside the original transcription. The default is to translate to English, but you can specify a different language in your prompt. You can also use this just to view dialogue lines as well without translation.
Translations appear in a dedicated **Dialog Manager View** below the chat, where you can:
* **Search for specific lines** to quickly find a particular section.
* **Play from any line** click on timestamp to hear the original audio alongside the translation.
* **Export to PDF** Download as PDF.
* **Copy line text** to paste into other applications.
You can bring up this view after transcription using any of the following prompts:
```
Translate the dialogue to English.
OR
Show me dialogue lines.
OR
Show me dialogue lines in Japanese.
```
***
## Volume Leveling
Automatically level dialogue or vocal recordings by generating a take volume envelope that normalizes dynamic range. Works on any voice, dialogue, or vocal items.
```
Level the volume on the selected items
```
```
Apply volume leveling to selected items targeting -23 LUFS
```
You can control the following parameters through natural language:
| Parameter | Default | What it controls |
| -------------------- | ------------- | -------------------------------------------------------------------------------------------------------- |
| **Target level** | -18 dB | If you want to use LUFS specifically say "lufs" in your prompt otherwise this defaults to peak loudness. |
| **Gain range** | -12 to +12 dB | Min/max gain adjustment — limits how much the leveler can cut or boost |
| **Attack** | 20 ms | How quickly gain increases — lower values react faster to quiet sections |
| **Release** | 80 ms | How quickly gain decreases — lower values react faster to loud sections |
| **Lookahead** | 50 ms | Shifts the envelope earlier to anticipate level changes |
| **Window size** | 50 ms | Analysis window — larger windows produce smoother, less reactive leveling |
| **Smoothing passes** | 2 | Number of smoothing passes on the envelope to reduce artifacts |
```
Level the selected items with faster attack (10ms) for more aggressive leveling
```
```
Apply gentle volume leveling with only 6dB of gain range
```
```
Level these items targeting -14dB with a 100ms window for smoother results
```